An overlay network is a virtual network built on top of an existing network. VXLAN’s (Virtual Extensible LAN’s) are an example of an overlay network. They allow for layer 2 network traffic to route over existing layer 3 network topology.
To do this, layer 2 ethernet frames are encapsulated inside layer 4 UDP packets by a VXLAN Tunnel Endpoint (VTEP). A VTEP could be a device such as a switch, or this can be done in software.
The default destination port for VXLAN’s is 4789/UDP. This is the well-known port number assigned for VXLAN encapsulation traffic, defined in RFC 7348.
Each VXLAN is uniquely identified by it’s VXLAN Network Identifier (VNI).
VXLAN’s should not be confused with VLAN’s.
VXLAN Linux Configuration
In this example, we have two hosts in a 192.168.1.0/24 subnet. This subnet will act as the overlay network.
kali: 192.168.1.192
ubuntuserver: 192.168.1.97
On our first Linux host, we can configure a VXLAN using the below commands.
Note, that if dstport isn’t set it will choose a random port number. The remote keyword is used to specify the next hop.
1 2 3 4 5 6 7 8 9 10 | user@ubuntuserver:~$ sudo ip link add vxlan0 type vxlan id 42 remote 192.168.1.192 dev enp0s3 dstport 4789user@ubuntuserver:~$ sudo ip addr add 172.16.1.2/24 dev vxlan0user@ubuntuserver:~$ sudo ip link set dev vxlan0 upuser@ubuntuserver:~$ ip addr show vxlan04: vxlan0: <BROADCAST,MULTICAST,UP,LOWER_UP> mtu 1450 qdisc noqueue state UNKNOWN group default qlen 1000 link/ether 0e:a7:e2:fa:96:cc brd ff:ff:ff:ff:ff:ff inet 172.16.1.2/24 scope global vxlan0 valid_lft forever preferred_lft forever inet6 fe80::ca7:e2ff:fefa:96cc/64 scope link valid_lft forever preferred_lft forever |
We can mirror this configuration on our Kali Linux system.
1 2 3 4 5 6 7 8 9 10 11 12 13 14 | ┌──(kali㉿kali)-[~]└─$ sudo ip link add vxlan0 type vxlan id 42 remote 192.168.1.97 dev eth0 dstport 4789┌──(kali㉿kali)-[~]└─$ sudo ip addr add 172.16.1.1/24 dev vxlan0┌──(kali㉿kali)-[~]└─$ sudo ip link set dev vxlan0 up┌──(kali㉿kali)-[~]└─$ ip addr show vxlan03: vxlan0: <BROADCAST,MULTICAST,UP,LOWER_UP> mtu 1450 qdisc noqueue state UNKNOWN group default qlen 1000 link/ether 12:5c:b1:4e:fa:b2 brd ff:ff:ff:ff:ff:ff inet 172.16.1.1/24 scope global vxlan0 valid_lft forever preferred_lft forever inet6 fe80::105c:b1ff:fe4e:fab2/64 scope link proto kernel_ll valid_lft forever preferred_lft forever |
We should then be able to send a ping packet across the link.
1 2 3 4 5 6 | ┌──(kali㉿kali)-[~]└─$ ping 172.16.1.2PING 172.16.1.2 (172.16.1.2) 56(84) bytes of data.64 bytes from 172.16.1.2: icmp_seq=1 ttl=64 time=0.229 ms64 bytes from 172.16.1.2: icmp_seq=2 ttl=64 time=0.210 ms64 bytes from 172.16.1.2: icmp_seq=3 ttl=64 time=0.190 ms |
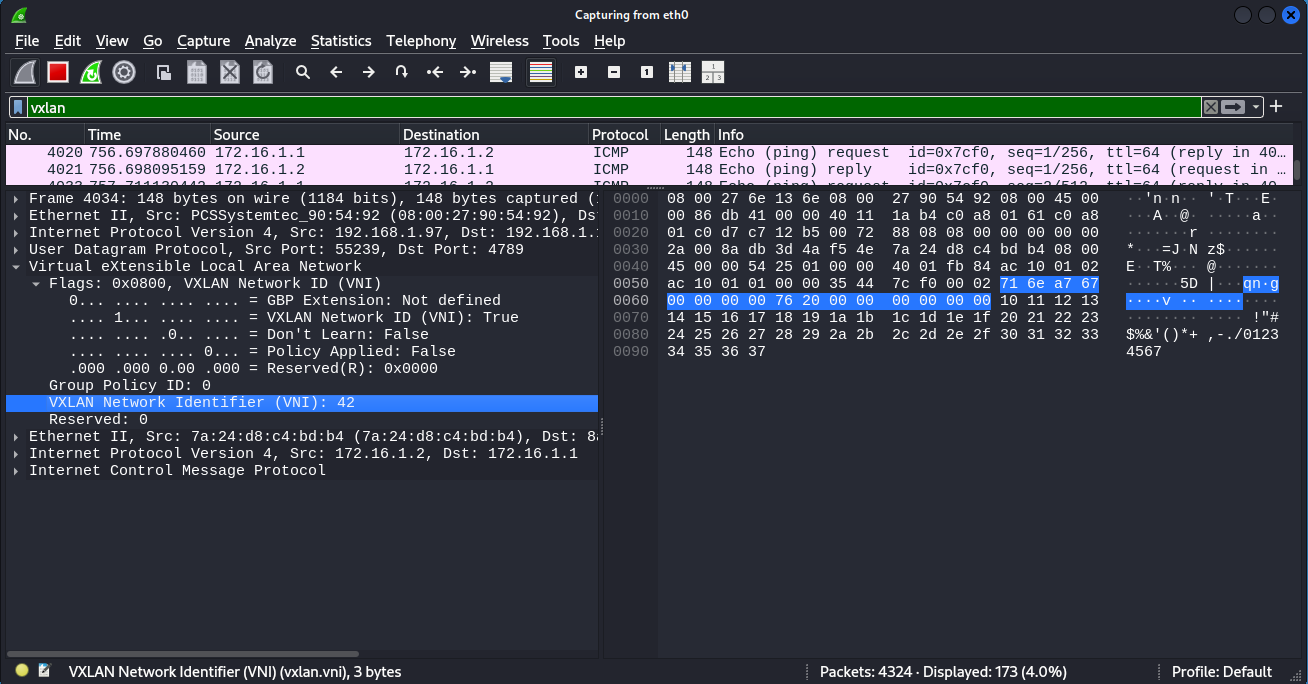
Using the VXLAN filter in Wireshark, we can see the traffic is being transmitted within VNI number 42.
Bridging Traffic
Whilst the above configuration shows that we have connectivity between the two hosts over a VXLAN, to actually forward traffic between remote subnets, we can use a bridge interface. In the below example, we are bridging interface enp0s8 to the VXLAN on the Ubuntu server system.
1 2 3 4 5 6 7 | user@ubuntuserver:~$ sudo ip link add br0 type bridgeuser@ubuntuserver:~$ sudo ip link set dev br0 upuser@ubuntuserver:~$ sudo ip link set vxlan0 master br0user@ubuntuserver:~$ sudo ip link set dev enp0s8 upuser@ubuntuserver:~$ sudo ip link set enp0s8 master br0user@ubuntuserver:~$ sudo ip addr del 172.16.1.2/24 dev vxlan0 # Remove previously configured IP address from VXLAN interfaceuser@ubuntuserver:~$ sudo ip addr add 172.16.1.2/24 dev br0 # Add IP to newly configured bridge interface |
We can verify the configuration using the bridge and ip commands.
1 2 3 4 5 6 7 8 9 10 11 12 13 14 15 16 17 18 19 20 21 22 23 24 25 26 27 28 29 30 | user@ubuntuserver:~$ sudo bridge link3: enp0s8: <BROADCAST,MULTICAST,UP,LOWER_UP> mtu 1500 master br0 state forwarding priority 32 cost 4 4: vxlan0: <BROADCAST,MULTICAST,UP,LOWER_UP> mtu 1450 master br0 state forwarding priority 32 cost 10user@ubuntuserver:~$ ip a 1: lo: <LOOPBACK,UP,LOWER_UP> mtu 65536 qdisc noqueue state UNKNOWN group default qlen 1000 link/loopback 00:00:00:00:00:00 brd 00:00:00:00:00:00 inet 127.0.0.1/8 scope host lo valid_lft forever preferred_lft forever inet6 ::1/128 scope host valid_lft forever preferred_lft forever2: enp0s3: <BROADCAST,MULTICAST,UP,LOWER_UP> mtu 1500 qdisc fq_codel state UP group default qlen 1000 link/ether 08:00:27:90:54:92 brd ff:ff:ff:ff:ff:ff inet 192.168.1.97/24 brd 192.168.1.255 scope global dynamic enp0s3 valid_lft 86135sec preferred_lft 86135sec inet6 fe80::a00:27ff:fe90:5492/64 scope link valid_lft forever preferred_lft forever3: enp0s8: <BROADCAST,MULTICAST,UP,LOWER_UP> mtu 1500 qdisc fq_codel master br0 state UP group default qlen 1000 link/ether 08:00:27:14:83:f9 brd ff:ff:ff:ff:ff:ff inet6 fe80::a00:27ff:fe14:83f9/64 scope link valid_lft forever preferred_lft forever4: vxlan0: <BROADCAST,MULTICAST,UP,LOWER_UP> mtu 1450 qdisc noqueue master br0 state UNKNOWN group default qlen 1000 link/ether 12:79:dc:fc:26:72 brd ff:ff:ff:ff:ff:ff inet6 fe80::1079:dcff:fefc:2672/64 scope link valid_lft forever preferred_lft forever5: br0: <BROADCAST,MULTICAST,UP,LOWER_UP> mtu 1450 qdisc noqueue state UP group default qlen 1000 link/ether 08:00:27:14:83:f9 brd ff:ff:ff:ff:ff:ff inet 172.16.1.2/24 scope global br0 valid_lft forever preferred_lft forever inet6 fe80::d026:e7ff:fef6:53ea/64 scope link valid_lft forever preferred_lft forever |
Saving the Configuration
If you want to permanently save the configuration, using NetworkManager is normally the best bet. On the Kali side, we can configure the VXLAN using the following nmcli commands. Note, this does not include a bridge interface.
1 2 3 | sudo nmcli connection add type vxlan con-name vxlan0 ifname vxlan0 dev eth0 id 42 local 192.168.1.192 remote 192.168.1.97 destination-port 4789sudo nmcli connection modify vxlan0 ipv4.addresses 172.16.1.1/24 ipv4.method manualsudo nmcli connection up vxlan0 |
In Conclusion
VXLANs (Virtual Extensible LANs) are used primarily in data centre networks and cloud environments to extend Layer 2 connectivity over Layer 3 networks, enabling the creation of scalable, isolated and flexible virtual networks.